Image Map
Showing posts with label diy. Show all posts

Tuesday, February 12, 2013

Super Easy Valentine's Decoration...Large Heart

Links provided may be from affiliate programs which help support this blog. Thanks for clicking!
I have been on an easy craft kick!  I have done this one two different ways, I am not really happy with this version and I will tell you why...

I took my large silicone heart shaped pan and added water, it is flimsy so put a pan under it.  

Add food coloring...
I was trying to make it marbly, it looks neat doesn't it?  
I think because of the high winds yesterday and because I didn't add the food coloring when the pan was in it's freezing place the colors muddled and turned out like this...

I am still happy with it but was inspired to make another one, it will be ready tomorrow, it is sitting outside right now. :)  I will share when it is done.  I added glitter and only one color.  I can't wait to see how it turns out.

I think it is a fun, subtle decoration.  I am planning on leaving the new one I make on my parent's porch Wednesday night and a little gift, granted they won't be able to keep it but it will be a cute I Love You in the morning.


Sunday, February 10, 2013

Super Easy Valentine's Day decoration...

Links provided may be from affiliate programs which help support this blog. Thanks for clicking!
Do you have a pan or ice cube tray that is heart shaped?  This is what I made today...


All I did was add food coloring to the individual "cups" and popped it in the freezer.  You can line them up on your porch, make a design on the drive away or you could even freeze a loop in them and then hang them in a tree!


Monday, January 7, 2013

Make It! Fun any holiday craft...

Links provided may be from affiliate programs which help support this blog. Thanks for clicking!

I love crafting on my own and with kiddos.  Here is a pretty simple and low cost project.

You will need:
white construction or watercolor paper
watercolor paints
watercolor brush or small paint brush
bowl for water (warm is better)
clear contact paper or laminator if you have one
hole punch
fishing line (ribbon or yarn will work too)
scissors

The one pictured is for Valentine's Day.  The beauty of this project is that you can do it for any holiday!  I have also made these for St. Patricks Day (shamrocks), Winter (snowflakes or as a "floating" snowman), Easter (egg, bunny head and a flower), I think you get the picture.

Cut your pieces I like to do it before I paint so you can get the tracing lines erased, if you have a little one though they would have more control if they are able to paint on a larger area.

Paint your shapes however you would like.  I always like multicolors but it really depends on what you are making.

When your painting is done and your shapes are dry (make sure you paint both sides) laminate them with your personal laminator or between the contact paper.  Then hole punch the area that are going to be hung.  Tie on your fishing line (I like the floating look) and make sure you tie on a holder.

Then hang!  These are really cute hanging from a ceiling fan or in a window. These are also a cute decoration to gift!

Please support this site by using the links provided.
Don't miss the freebies, coupons, and discounts! Subscribe Now! Check us out on Facebook to find more deals and extra giveaways!

Sunday, December 30, 2012

Do you have a lot of candy canes? Make these!

Links provided may be from affiliate programs which help support this blog. Thanks for clicking!
 If you have candy melts and candy canes you are ready to make chocolate covered candy canes!

Use a microwave safe bowl to melt your candy melts 30 seconds at a time, the more you add the longer it will take.  Mix in between intervals.  When melted simply dip your candy canes in the melted chocolate.  You will probably want to refrigerate the candy canes so the chocolate hardens.
When you are ready you can use the candy cane as a stir stick!  I still used a spoon because I just dropped my chocolaty candy cane in my cup. :)  It really adds a pepperminty flavor to your hot cocoa, you could also do this for coffee!!!

You might also like these Wilton Snowman Candy Cane Molds.

Please support this site by using the links provided.
Don't miss the freebies, coupons, and discounts! Subscribe Now! Check us out on Facebook to find more deals and extra giveaways!

Friday, December 21, 2012

DIY Scrap Ornaments...

Links provided may be from affiliate programs which help support this blog. Thanks for clicking!
I was about to toss these little scraps that I had in a jar, I knew I kept them for a reason, I am not sure where they actually came from!
Anyway, I stuck them in a clear glass ornament.  I prefer the plastic ornaments but I picked up the glass at a rummage sale.  
So this project was way under $1!  All I did was use the scraps I had and the ornaments I picked up from a rummage.  You can get the ornaments at Walmart, Michaels or Joanns.  I might add some glitter or a bell or two. :)
If you have the paper from a hole punch that would make a neat filler too!


Please support this site by using the links provided.
Don't miss the freebies, coupons, and discounts! Subscribe Now! Check us out on Facebook to find more deals and extra giveaways!

Monday, December 10, 2012

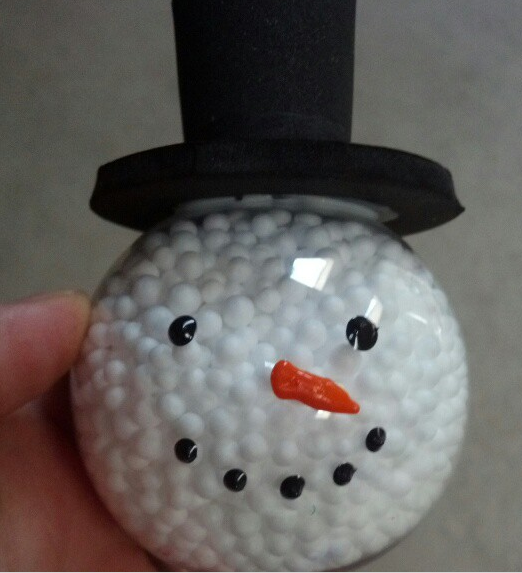
Cute Snowman Ornaments! Easy and inexpensive!

Links provided may be from affiliate programs which help support this blog. Thanks for clicking!
You will need...
  • clear glass or plastic ornaments
  • puffy paint in black and orange
  • glue gun or tacky glue-I prefer tacky as glue gun can melt foam
  • black foam sheets I used a 6mm and a 2mm thickness
  • something white for the inside (can be cotton balls or acrylic paint) I had the little styrofoam balls from a delivery
  • I also used items around the house to trace pieces for the hat
If you are more clever than me you could add a scarf, I bought green and red puffy paint too but I didn't like how it looked so I waited for it to dry and just peeled it off. :)

You will want to make sure your ornament it clean, if you have rubbing alcohol this would be a good cleaner, just rub gently so you do don't scratch or break the ornament.

If you are using acrylic paint you will want to swish it around and let the inside dry.

I started by filling the ornament.  Then simply add your face.  Let dry, I let mine dry overnight.  If you don't like it just peel it off and start over! :)

Hat...I traced the bottom of a vitamin container for the brim of the hat then the top of a 20 ounce bottle for the inside.  I then eyeballed the top part of the hat.  I rolled the thin top part to fit into the brim and then glued those together and glued the top to the top of the ornament.  The inside hook part stayed on the ornament so the hook will just come out of the top!

Easy and inexpensive!


Please support this site by using the links provided.
Don't miss the freebies, coupons, and discounts! Subscribe Now! Check us out on Facebook to find more deals and extra giveaways!

Monday, November 5, 2012

K-Cup Craft, great ornaments!

Links provided may be from affiliate programs which help support this blog. Thanks for clicking!
I have to brag a little, I am very impressed with myself for coming up with this.  We are making some ornaments for some Holiday Community Trees.  We have been saving the juice cups from the breakfast program and the plastic cups from Meow Mix Cat food but I have always wanted to do something with the used K-Cups.  I was bummed when I tried my project the first time because it did not work out and threw it way, I then thought a few minutes and came up with a different design.

BAD, yes I took it out of the garbage so I could show what not to do.


GOOD!  So all I did was make smaller/thinner cuts and it worked!  I needed to use this as an example at work so I colored it in.  We are using these outside so I used permanent markers.  You could use craft glue and glitter or other craft supplies.  We love them!  I am so happy top have a use for the used K-Cups!  Oh!  Also if you have craft supplies these are virtually free crafts!


Please support this site by using the links provided.
Don't miss the freebies, coupons, and discounts! Subscribe Now! Check us out on Facebook to find more deals and extra giveaways!

Thursday, November 1, 2012

Make it yourself! Challenge Bottle!

Links provided may be from affiliate programs which help support this blog. Thanks for clicking!
Do you have kiddos that are looking for a challenge?  I certainly do!  At work I am always looking for a challenge to pose to them.  Here is what I cam up with and it really didn't cost me anything!
I keep odd items and have been keeping the holes from my hole puncher and binding machine.  You could just use a hole punch or the items from a criss cross shredder.  Find a bunch of little items like a pen cap, marble, paper clip, crayon, safety pin, die, plastic animal, magnetic letter...put a bunch of items in there, I am hoping to get about 50 things.

Put them in your cleaned and dried plastic bottle and loosely fill with the scraps so the items will still move around and can be shaken and uncovered.


I am challenging my kiddos at work, whoever finds and writes down all the items in the container will get a prize.  I don't expect this to get done in a day, it will be something that they can come back to when they are looking for something to do.  I think I will be making a few.

Do you have any suggestions of some small items that can go in the bottle?

Please support this site by using the links provided.
Don't miss the freebies, coupons, and discounts! Subscribe Now! Check us out on Facebook to find more deals and extra giveaways!

Monday, October 22, 2012

Looking to get crafty for Halloween? Make these Eye Candle Holders...

Links provided may be from affiliate programs which help support this blog. Thanks for clicking!
I am always looking for ways to re-purpose items and fun crafts for my kiddos at work.  I found this project in my Family Fun Magazine a while back but here is a link to the project online.  Instead of purchasing the votive older I use baby food jars!  You could certainly use jars from pasta sauce or any thing else, you would just be making it on a larger scale.  I put a layer of Mod Podge down then one of my hole punched papers (torn about 1/2 by 1 inch).  Then put the Mod Podge on top too so it seals.  It dries clear so you don't need to worry about white spots.  When everything is dry just make a pupil with a black permanent marker or paint pen.  If you are using a jar with a lid you could also use this as a treat jar too!


Please support this site by using the links provided.
Don't miss the freebies, coupons, and discounts! Subscribe Now! Check us out on Facebook to find more deals and extra giveaways!

Thursday, September 6, 2012

Make a Grandparents Day gift for $1 at Michaels...

Links provided may be from affiliate programs which help support this blog. Thanks for clicking!

Mark your calendar and head to Michaels on Saturday, September 8th to make a Grandparents Day Gift!  For $1 your child (ages 3 and up) can make a frame for Grandma or Grandpa.  This is available from 10-noon.
Call ahead to double check that your local store is participating. :)  It is on the Michaels website.

Please support this site by using the links provided.
Don't miss the freebies, coupons, and discounts! Subscribe Now! Check us out on Facebook to find more deals and extra giveaways!

307728_Coupon Savings - 180x150

Tuesday, August 28, 2012

Save $5 on Benjamin Moore Paint or Stain

Links provided may be from affiliate programs which help support this blog. Thanks for clicking!
Are you planning on sprucing up a room during your long weekend?  Head to your local hardware store and pick up a gallon of paint!  Sometimes that is all you need to revamp a room, try a new bright color! :)  You will not find this at big box stores, support local and find the list of stores in your area here.  With this coupon you will save $5.00 on one gallon of Benjamin Moore Premium paint or stain.

Check out the great coupons from Coupons.com!

Please support this site by using the links provided.
Don't miss the freebies, coupons, and discounts! Subscribe Now! Check us out on Facebook to find more deals and extra giveaways!

Saturday, August 18, 2012

Betsy vs. Mr. Betsy Homemade Coasters (Which one do you like better?)

Links provided may be from affiliate programs which help support this blog. Thanks for clicking!

We love a challenge.  I love doing little home projects.  Mr. Betsy and I challenged each other to make some coasters for a couple side tables we have that were my grandparents.  They are old and we don't want them ruined but we do want them used so  we thought to make coasters!  We are going to try and do a challenge each month, we will be keeping track and 


BETSY


I made these coasters out of felt pieces that I had in my craft stuff already and I had the seed beads as well, and the needle and thread.
I traced a coffee mug bottom and cut out four circles.  These coasters are green on one side and blue on the other, I chose to put the decorations on opposite colors.  My seed beads were a mix of colors so I just grabbed whatever colors came to me.
Place the two circles together and get your needle and thread ready, sew on one seed bead at a time, make the stitches small and close together.  Each one took me about 20 minutes, I am not a great sewer so it might take you less time.  I think they turned out well, they are perfect for a cup or a canned beverage.

You will need:
Seed beads
Sewing Thread
Needle
Felt


MR. BETSY
We had some left over tiles from when we moved into our home.  You can purchase boxes and possibly even single pieces at home improvement stores.  He wanted to put something clever on the tiles so he spelled out "for cups" on one and H2O on the other.  If you like his project this is what he used...

Scrapbooking Stickers
Tiles
Modge Podge
Felt (for the back)

Clean the tiles with spray or rubbing alcohol and let dry.  Figure out what you are going to spell out and make sure you have all the necessary letters handy.  Start by covering the area with the Modge Podge and then lay the stickers on.  Cover again with Modge Podge.   Let dry and coat about three times.  Also cut the felt to the size of the tile and glue that on the back so it does not scratch any surface you are putting it on.

We want to know...
Which project do you vote for?  Please leave a comment, we are having a little home competition. :)

Please support this site by using the links provided.
Don't miss the freebies, coupons, and discounts! Subscribe Now! Check us out on Facebook to find more deals and extra giveaways!

Thursday, August 16, 2012

Niecey and I made this fun dough today!

Links provided may be from affiliate programs which help support this blog. Thanks for clicking!


You will need 5 cups of flour  (I used all purpose)
1 1/2 cups oil (I used vegetable oil)
Mixing bowl
resealable plastic bag or container

This is really easy...just combine the two ingredients and you are set!  Use cookie cutters, knives cups or just your hands to create and play!  This should last at least a week depending on how long it is exposed to air, you can add food coloring or flavoring if you want a scent.  I like it "natural".  You know what is great?  These are food items so if it does get eaten you shouldn't have to worry, although it is not suggested, do you really want to just eat flour and oil?

Please support this site by using the links provided.
Don't miss the freebies, coupons, and discounts! Subscribe Now! Check us out on Facebook to find more deals and extra giveaways!

Sunday, July 29, 2012

Make your own coasters!

Links provided may be from affiliate programs which help support this blog. Thanks for clicking!

I love doing little home projects.  Mr. Betsy and I challenged each other to make some coasters for a couple side tables we have that were my grandparents.  They are old and we don't want them ruined but we do want them used so  we thought to make coasters!
I made these coasters out of felt pieces that I had in my craft stuff already and I had the seed beads as well, and the needle and thread.
I traced a coffee mug bottom and cut out four circles.  These coasters are green on one side and blue on the other, I chose to put the decorations on opposite colors.  My seed beads were a mix of colors so I just grabbed whatever colors came to me.
Place the two circles together and get your needle and thread ready, sew on one seed bead at a time, make the stitches small and close together.  Each one took me about 20 minutes, I am not a great sewer so it might take you less time.  I think they turned out well, they are perfect for a cup or a canned beverage.

You will need:
Seed beads
Sewing Thread
Needle
Felt

Please support this site by using the links provided.
Don't miss the freebies, coupons, and discounts! Subscribe Now! Check us out on Facebook to find more deals and extra giveaways!

Thursday, May 31, 2012

Create a homemade family compost bin under $20!

Links provided may be from affiliate programs which help support this blog. Thanks for clicking!

(You might remember seeing this post last summer, I am still using my homemade compost bin, here is a refresher.)
I saw one like the one I made at a nature program I was attending (I refused to pay $20.00!), I then created my own!
I started container gardening a couple of summers ago, I am not a pro, not every plant comes out great but I love seeing that something is growing.

Each summer I am able to make salsa a few times.  I have found that my  favorite things to grow are peppers and herbs.  Last summer I used a Topsy Turvy Upside-Down Planter for my peppers-it was really neat.  For my herbs I just used the containers.  I also had a peanut plant (I think I purchased it too late in the summer to see any good results.  My tomatoes never grew last year-again I think I started them too late). 


Well my point to this is that I am having to get soil for my containers.  It can get expensive and honestly I do not buy expensive dirt-I also don't buy anything really fertilized or organic.  I have thought of a compost bin but I know that I am not going to want to "turn" the dirt and I also did not want to invest in a turnable compost bin in case I choose to not stick with composting, I am excited to say that I have stuck with it and have been adding my scraps to the bin throughout the winter. 

Here is how to make your homemade compost bin, you can certainly make this a fun family activity that won't take a long time and is inexpensive:

  • one Rubbermaid container (I say Rubbermaid because the plastic is more flexible and durable)
  • newspaper
  • food scraps
  • red wiggler worms
  • dirt (just some from the yard is fine)
  • water
  • leaves or some cut grass
  • screwdriver
Okay so all I did was take a Rubbermaid container that I already had,  poke a few holes in the bottom for drainage (I did 4, one at each corner), add some dirt, took some newspaper and shredded it by hand, threw some fruit and veggie scraps in, grass or leaves, red wriggler worms and moisten the whole thing, poke a few holes in the top for ventilation and you are set!  You can order the worms online for $25! Yeah-I was not paying that-I started calling bait shops-I purchased mine from Joe's Bait Shop on 6th and Lincoln.  I received 30ish worms for under $4.00.  I have purchased more worms, I get two containers at a time.  The worms do last about 6 months.  Once a week or so just shake up the contents, you could also do it each time you add scraps.  Kiddos can throw on some gloves or get their hands dirty and carefully mix up the contents by hand.  Sometimes getting dirty is the most fun. :)

Make this a fun family activity...
  • kiddos can tear up the newspaper into strips (young children can do this, my niece loved shredding paper when she was 10 months!)
  • kiddos can add the worms (treat them with gentle hands, they are your workers and need tender loving care)
  • kiddos can add the dirt/soil
  • You might want to poke the holes in the lid and the bottom unless your kiddos are a little older, it would be a good learning experience but definitely supervised) 
  • Rule of thumb: if it required some kind of dirt to grow it can go in the compost bin.  Carrots, oranges, apples, beans, you get the picture.  No meat!  This is a great way to get your family to realize how much waste goes in the garbage and may have them thinking about what they consume and how much they take.  
  • I know that kiddos are more excited about activities that they were able to help create.  This could be a great job for children.  After dinner or snacks they can be in charge of putting the acceptable scrapes in the compost bin.
  • Kiddos can also help with the "turning" of the bin, they can shake it or get their hands dirty and move the contents around, just be gentle your worker worms need to be treated with care).
  • If so inclined kiddos can use acrylic paint or permanent markers to decorate the outside of the bin.  Use words like recycle, garden, flowers, veggies, put your family name on it, be creative.  Also add pictures like fruits and veggies, flowers, sunshine, worms, the possibilities are endless.  Make it fun!  I wouldn't use stickers because they will fall off in the rain and just become trash.
Completing my container compost bin cost me under $20 (bin would have been about $5 but I used one I already had, food scrapes $0, free newspaper, worms a little under $8-every six months).
In the long run you will end up saving money on the dirt you will need for planting projects.  The dirt from compost bins is also more nutrient rich, my uncle calls it "gardener's gold" because it is richer and is better for growing fruits, veggies, herbs and more.

  Experience=Priceless :)

Do you have a compost bin or container?

***It is important to use newspaper not magazines or gloss paper as that will not break down the same way.  Periodically add more grass/leaves and newspaper to add the variety to the bin, it helps get everything broken down, your worms will appreciate it and your kiddos will have fun ripping and adding it. :)

*Please support this site by using the links provided. *
Don't miss the freebies, coupons, and discounts! Subscribe Now! Check us out on Facebook to find more deals and extra giveaways!

Friday, April 6, 2012

Spruce up your wardrobe with some simple stitching!

Links provided may be from affiliate programs which help support this blog. Thanks for clicking!
Looking for a quick addition to your wardrobe?  Create a shirt with a few easy items!  For Valentine's Day one of my aunts made me a t-shirt with stitching around the collar and a heart on the shoulder.  This inspired me to want to create a shirt for St. Patrick's Day and every holiday!  Unfortunately St. Patrick's Day has come and gone and I just ran out of time.  I was going to do an Easter themed shirt but thought Spring might be a better inspiration.  So I set to work...
Fortunately I had many of the supplies I would need.  I did pick up a t-shirt from Michaels since I was in the neighborhood.  I chose blue because it is sky-like.  I had embroidery floss at home from some other projects and needles, I also had the embroidery hoop.
I started by lightly marking my design with a pencil.  I attached my embroidery hoop and threaded my needle and set to work.  Depending on your sewing skills (honestly mine are not great) it may take you a while or you might just buzz through this.  We have been doing some sewing at work and I can tell you this would be a great project for kiddos.  It does take time and concentration but the results are priceless.


*Please support this site by using the links provided. *
Don't miss the freebies, coupons, and discounts! Subscribe Now! Check us out on Facebook to find more deals and extra giveaways!

Wednesday, March 14, 2012

St. Patrick's Day Centerpiece for under $2.00 and under 1 hour!

Links provided may be from affiliate programs which help support this blog. Thanks for clicking!
This is a relatively easy project that can liven up your St. Patrick's Day dinner table or you can add a hole and string and you can hang it on a door or wall.

Start with a foam sheet, I purchased a sheet that was already glittered it was $1.50 at Joanns.  Make a stencil of a shamrock.

Trace your shamrocks on the foam sheet, I traced on the non glitter side so the ink would not show when my project was done.  I needed 15 shamrocks for my project, it will depend on how big or small your shamrocks are and how big or small you want it.
This is a fun project and you can make it for any holiday!  I think I will be making one for Easter, the 4th of July, Halloween...stay tuned. :)

Use tacky glue or a hot glue gun to secure your shamrocks together, just glue the ends and over lap a little so the circle is secure.

The hot glue dries/cools quickly, that is what I used.  If you are using tacky glue be sure to give your project time to dry.

After you have glued all your shamrocks you will have a cute and simple decoration!  You could also make this out of construction paper or a rainbow of colors, I might do that next...remember ROY G BIV...red, orange, yellow, green, blue, indigo, violet.

Happy crafting and spending time together.


*Please support this site by using the links provided. *
Don't miss the freebies, coupons, and discounts! Subscribe Now! Check us out on Facebook to find more deals and extra giveaways!

Sunday, February 26, 2012

Festive Homemade Dog Treats

Links provided may be from affiliate programs which help support this blog. Thanks for clicking!
 2 1/2 cups white corn meal mix
1 1/2  cups all purpose flour
1 1/2 cups Fruity Pebbles
3 tablespoons vegetable oil
2 eggs
1 cup warm (I just used room temperature) beef broth

 In a large bowl blend the corn meal mix, flour, and Fruity Pebbles.
In smaller bow, mix vegetable oil, eggs, and broth.
Then, mix together the ingredients in the two bowls and roll out the dough to a 1/2 inch thickness.

 Cut out shapes with a cookie cutter (a bone would be cute, I used a fire hydrant).  Brush the biscuits with lightly with the rest of the broth.  On a greased cookie sheet or parchment paper (I greased aluminum foil on a cookie sheet) bake the biscuits at 350 degrees for 25 minutes.  Turn the oven off and return the baked treats to the cooling oven for several hours.  The longer you leave them in the oven the crunchier they will become.  Store them in an airtight container.

The quantity of treats will vary depending on how big your cookie cutter is.


*Please support this site by using the links provided. *
Don't miss the freebies, coupons, and discounts! Subscribe Now! Check us out on Facebook to find more deals and extra giveaways!

Friday, February 24, 2012

Make your own "bar" out of a dresser!

Links provided may be from affiliate programs which help support this blog. Thanks for clicking!

Homemade "Bar"


This project has been on my "Honey Do List" for about 7 years, ever since we saw it on one of those DIY home project shows.  Basically you turn a regular 4 or 5 drawer dresser into a small home bar with a tub for ice and a door which would reveal 2 shelves.

You begin with a dresser, here is the one I used.


Pull out the second and third drawers from the dresser.  Then cut the fronts off the drawers.

You will also have to remove any cross piece that separates the drawers, leaving a large gap in the dresser.


Then connect the drawer fronts and the cross piece using wood glue, you may need to use some extra pieces of wood to create enough surface area to connect everything together.


Next you will need to cut a hole in the top of the dresser.  Measure it out so that it fits the size of the tub you have chosen to use as your ice bucket, but make sure the hole is not too big that the tub falls through the hole.


Once the wood glue has had enough time to set, connect the drawer front door to the  dresser using hinges.


The shelves that are inside the door are created by reinserting the drawers that you cut the fronts off of.


I then painted it using some different "oops paints" that we had picked up at Home Depot.  The "oops paints" are paints that have been returned for various reasons and are sold for as low as $1, depending on the size of the can.  These come in handy for small projects around the house.


Then you place the finished product into your house.  We put ours in the back half of our family room.


In case you were wondering, that is a Green Bay Packer soda machine next to the bar.  Jealous?


*Please support this site by using the links provided. *
Don't miss the freebies, coupons, and discounts! Subscribe Now! Check us out on Facebook to find more deals and extra giveaways!
 

Blog Design By Lucky Girl Design Studio © All Rights Reserved. | Copyright © My City Mommy LLC 2009 All Rights Reserved